Tuesday, January 29, 2013

You can call me, MR. Owl

I no longer have a camera or a phone with a camera--so I am very limited to sharing my creations and recent craftiness with you. I have to bug my oldest son to snap a pic when I can. Here is a recent order I completed.

A friend placed an order for her son's birthday and this is what I came up with.


I added the mustache last minute,  on a whim and I really like it. Yep, it's trendy, but still cute. The body fabric is light blue with small green frogs. The back of the owl's body matches but has large green frogs. The inside of the wings are a different fabric too...it's the light blue with tiny darker blue polka dots, it coordinates...I think that is what fabric I used. I can't remember exactly now. 


I think this was the first owl I made with really long legs and flappy wings. There have been quite a few others between this one and Mr. Owl with the mustache...but again--NO camera. boohoo!

This one was also a birthday gift for a baby cousin. I created dollies with wings, turning them into fairies and Ms. Owl, with lovely eyelashes. each one is a totally unique, one of a kind creation. I get a color scheme from the client and then fulfill the order by mixing and matching fabric choices based on their color scheme.

I have an order cut right now that will be using red, white and blue coordinating fabrics.  She should be finished within the next few days.

Thursday, September 13, 2012

Prophetic Art Journal Page

A few months ago I finally started a project I've been wanting to do for awhile. It's an art journal. It combines basic journaling with more artistic flair...from what I can tell.

I've also been using a technique often referred to as an 'altered book' because I took an actual hard back book and used the pages for my own purposes. My book is a combination scrapbook, journal, and inspirational quotes and verses. So basically everything and anything, whatever I feel like at the time.

My children can draw but that is one artistic endeavor I seem to have no skill in, so I never attempt it. However, I can do simple shapes. The other day I had a vision, a divine inspiration in the form of  a picture in my head. I decided to attempt the picture into my book. I like how it came out...but now I want to add a couple verses to the page...

(forgive me, I do not have a 'real' camera that works so I am limited to my camera phone! :-( 
If I make the images any bigger they are horribly blurry)


It's a sketch of a tree.  


The roots of the tree have the words HOPELESS in them. 


Whether you can see it or not, ALL the leaves have the word HOPE written in them.

I have since learned there are two verses that refer to 'healing leaves'.

Rev 22:1 Then the angel showed me the river of the water of life, as clear as crystal, flowing from the throne of God and of the Lamb down the middle of the great street of the city. On each side of the river stood the tree of life, bearing twelve crops of fruit, yielding its fruit every month. And the leaves of the tree are for the healing of the nations.

Eze 47:12 Fruit trees of all kinds will grow on both banks of the river. Their leaves will not wither, nor will their fruit fail. Every month they will bear, because the water from the sanctuary flows to them. Their fruit will serve for food and their leaves for healing."

I did not even realize these verses existed. One night after our family prayer and worship time I asked one of my sons, "What is God telling you right now?"
"Let the leaves awaken to speak."
"What?" Did I hear that right?
"I don't know, that's just what He said."
"I know but what was it you said?"
He repeated himself and I knew immediately it related to the picture-he knew nothing about it. I showed him and felt pretty excited about it. The next day I unexpectantly met with a friend to pray. She happened to reference the Revelation verse quoted above with out me even mentioning my picture. I was excited to show her and tell her what my son had said.

God works like that, putting all the puzzle pieces together. He speaks to us in images, words, thoughts, ideas...through any and everything. This was extra fun for me because I rarely draw...my children are always drawing prophetic pictures at church. So this was a new experience for me.

I really enjoy the art journaling because it allows me to create a page and fulfill my urge to create, rather quickly and easily. I mostly use layered papers and stickers to create a page I can write on. I also have verses.

I will add more posts with pix of other pages, later.

Monday, May 28, 2012

Knock-Off Drape Dress


Garment Sewing Challenge: May 2012


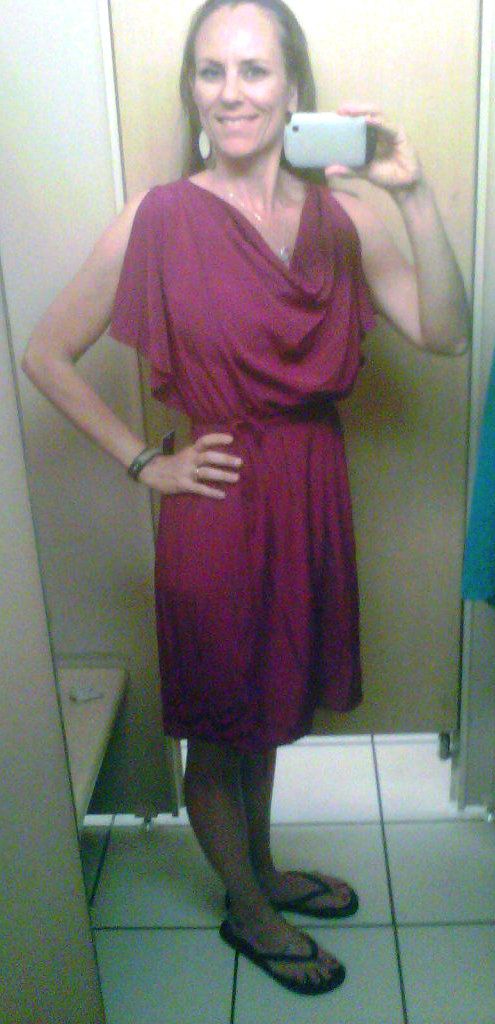
I was searching for a dress for my graduation and this one at Target caught my eye. It was $24.99. The fabric was a nice and soft polyester. It didn't seem to be a very complicated style though...or so I thought. I was sure I could recreate it myself. I loved the knee-length and the no-cleavage-show neckline.

Here is the inspiration dress--from the dressing room in Target.

It's flattering, right?
How hard could it be...it just hangs there...

Initially, I went to work to find a pattern. Guess what? NO pattern. Trust me I searched the pattern books, online AND in person. I was going to have to go this *alone*.

I did find an online tutorial for a sleeveless maxi-dress that had a slight drape along the neck--but otherwise, it was nothing like this dress. I used that tutorial simply as a yardage reference. It recommended 1.5-2 yards of fabric.

I also wanted this deep magenta color. I headed to Joann Fabric's to see what I could find.

I purchased the closest thing to magenta they had and a green in the same--both fabrics were polyester, which is exactly what the original fabric was.

 Oh! I was SO afraid to actually CUT the fabric. I finally went back to Target & purchased the original dress so that I could take it's measurements and inspect it a little more closely. I purchased it in green so I would not be tempted to keep it.

I wrote down all the measurements and promptly returned it.


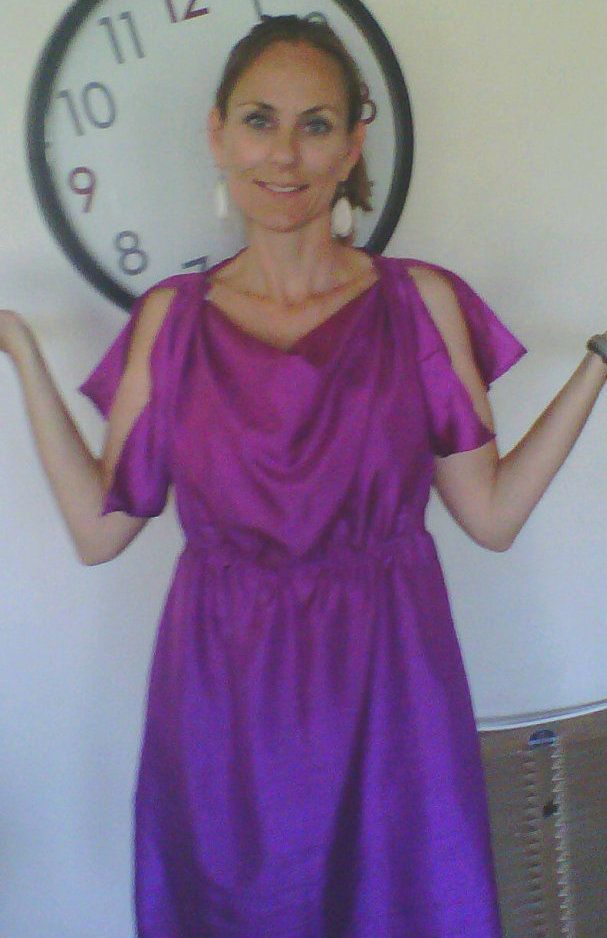
I finally built it, after fighting with the bobbin thread. The front was not as drapey and the sleeves were too short? I realized the front was supposed to be 48 in across and I had cut it to 36 in across. EEK! Ok...I cut two panels and added them to each front 'sleeve'. Ok..it could work.

I sewed an elastic waste. I used a circle of elastic I had in my stash--from a pair of underwear (I always salvage the elastics) one of the dogs had chewed! The waist ended up being a tad bit too high and the sleeves a bit uneven.


BUT otherwise, I LOVE it! I tied the sleeve edges together and you don't even know they are uneven!

TADA!!!!

It was a little breezy when I took this pic. Sorry.
I wore this dress to my graduation banquet.

Then I found another polyester fabric that had a different weave that was much closer to the fabric of the original dress...I knew I just HAD to use it for my actual graduation.

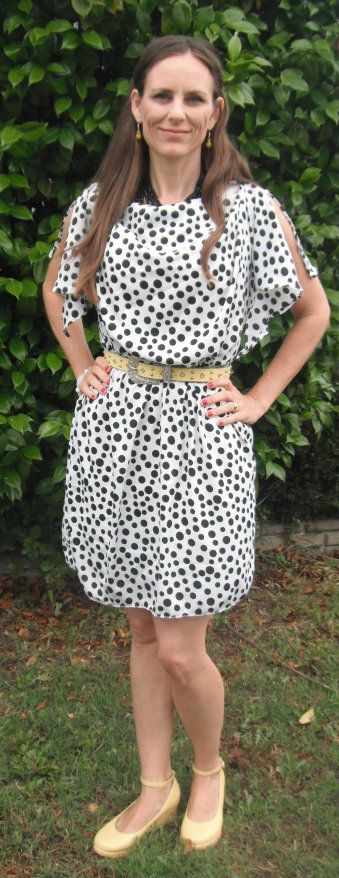
THIS is my entry for the sewing challenge!
The school colors are black & yellow. My DIY invitations -announcements  were black and white polka dots with a yellow ribbon accent. I knew I just HAD to get this fabric and accent it with yellow.

The sleeves came out much better since I paid better attention to the correct measurements the second time. haha.

This fabric draped much nicer. The neckline actually drapes lower than this picture implies.

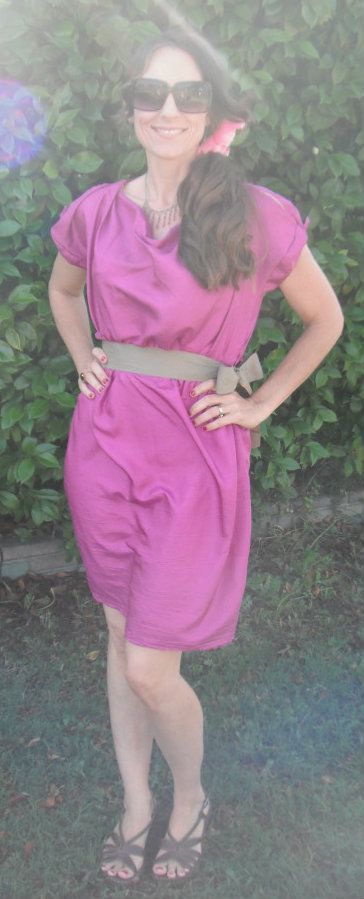
I have two more fabrics to make two more dresses. I LOVE this style THAT much. (oh--so that makes 4 dresses for just a little more than the price of the ONE original dress after I purchased sale fabric & used a coupon! Kerching! Kerching!)

The hardest part was the shoulder seams. The front neckline is actually folded under and sewn to itself with the back neckline in between. It created some trickiness for sure.

What I love most about this style is the ability to dress it up with accessories and heels or dress it down with casual flip-flops and no belt. As far as building it-it's also VERY forgiving to create. The addition of a belt or ribboned waist hides any perceived flaws in the elastic waistline. It's also a flattering shape for the body because it is not clingy. It's comfortable and easy to move in because of the flow and loose style.

Except for the slight issue with the shoulders...the style isn't too hard to actually build. I didn't even hem either one of them. The pink (can that pass for magenta?) one I kept the selvage edge along the bottom so I wouldn't have to hem. The polka dot, I simply serged the bottom. When I make another one...I will probably serge the sleeves as well. (I did tiny hems on all the upper body edges)

Do you want to make one of these dresses now? I think you should. I'm thinking there are so many possibilities....ribbon tied shoulders? tank cut shoulders? etc.

Just keep picturing it as basic shapes: rectangle bottom and upside down triangle for the top. Voila'!
If you make one...be sure to share it w/ me cause I'd love to see it.

Linked to:


Visit My 1929 Charmer Blog!
Our Delightful Home

52 Mantels

Monday, March 26, 2012

Hey! I made a little book.


I've been fascinated by the idea of art journaling and altered books for years but have always been intimidated by it. I can't paint or draw and many of the lovely page spreads I've seen include both. Add to that, I can never figure out or decide what type of book to actually use.


I knew what I would really like to do is create my own book anyway. I finally found a great tutorial and made one, chunky, little book. I am so excited to make more. I also started an art journal but it's not finished yet so no pix for that.


It wasn't very hard at all. Supplies used were: index cards, card stock, scrap card board, scrap of ribbon and a glue gun. Voila'!

The cover was created using a very thick card stock, it was a little hard to crease and fold properly. next time I'll use regular card stock that isn't so thick. I also want to make a bigger one.

Check out this great tutorial to make your own hand made book!

Linking to:

DebbieDoos Newbie Party

Sunday's Best Linky Party!

Sunday, March 18, 2012

St. Patrick's day goodies


St. Patrick's Day gets barely a nod in our home but I did manage a few treats and goodies. I have been seeing folded paper medallions online and decided to make one for our front door. I gave it my own 'twist' by only creating a half medallion. I layered 3 different papers on top of each other, topped with a *clearance* sparkly shamrock.

It was quick and simple...once I found my glue gun. Never found the glue sticks so I hopped back into the car for the 2 minute drive down the street to Joann's to purchase a bag of glue sticks. I had my %40 off coupon handy so they only cost a few dollars.

Later, I melted vanilla and chocolate 'meltys' in my sister-in-love's microwave to dip pretzel sticks in for a yummy and simple treat. I used neon green food coloring in the vanilla and green sprinkles for a festive look. Nothing is yummier than a sweet and salty treat like a chocolate dipped pretzel! Right?

Dipped pretzels make a great treat gift for any occasion. All you hvae to do is coordinate your sprinkles for the occasion & voila'!

Sunday, January 22, 2012

Save those pants!


We rarely have much less use bleach in our home. However, of course the ONE time we do---the Birdy Girl mysteriously got bleach spots on a pair of her pants. They fit her well and had lots of life left int hem, so I hated to have to get rid of them.

After seeing a few pots in blog land about 'art' they made with bleach pens....I splurged and purchased one. I knew that was the answer.


We went to town creating dots and flowers and eventually swirls on her pants to cover up the original spots. It took some getting used too but by the end we were nearly pros. haha.


The 'pen' has two ends, a fine point and a thicker point. The fine point was used for the swirls and the thicker end worked well for the larger polka-dots. Occasionally, the liquid would come out fast and thick so you really should practice on scrap fabric to get the hang of it. We didn't care too much since these pants were already *ruined*, we had nothing to lose. The girl loves how they turned out and now she has extra life in her pants as well a fun 'new' pair.

Thursday, January 19, 2012

Love This.


Source: austinkleon.com via Katy on Pinterest


I love this.I really do. There is so much creative inspiration in the world around us....mostly I see an idea somewhere else and then I create my own version of it...that is why I don't sell much. I don't make a good seller--I'd rather SHOW YOU how to make your OWN version than charge you so I can make it for you.....sigh.

I especially like #3 and #6...which rules to you like the best?