Showing posts with label tutorial. Show all posts

Saturday, December 10, 2011

Christmas Memorial Wreath

I wanted to make a rosemary wreath this year. I love the scent and the symbolism. Rosemary means remembrance. I thought it would be a nice way to remember those we miss so much during the holiday seasons. Plus I have three bushes of it growing in my garden. It also welcomes guests with a lovely fragrance when they enter through our doorway.
 
SUPPLIES:
wreath form
floral wire
rosemary
scissors (to cut wire)

I used two coupons I had for Joann's. The wreath form and floral wire were around $2 each full price but with my two coupons I was able to get each of them for about half price. I have lots of wire left over for another project too. That makes the cost of this wreath UNDER $2!

You could virtually make this project for *free* using a wire hanger (we never have any since the Mr. no longer needs to dry clean his clothes) bent into a circle wreath form and yarn, twine, fabric scraps, or twisty ties that you have around the house to attach the rosemary. Don't be afraid to try various herbs or plants. I have read that boxwood makes a great wreath...I might try that next because I have a large box wood bush in my back yard too.


1. Starting with the longest and most pliable pieces, I wired stems along the inner most ring of the wreath. Work the wire like thread, up and around the stems and wire.


2. Use other long and pliable pieces to wire stems along the outer most ring of the form. Over lap tips and ends.


3. Use the split or bushy stems to fill in the center of the ring. Over lap tips over ends, wiring as you go. This section is more of a challenge to work with the wire. I suggest using smaller lengths of wire at a time and twisty them off on the back. I actually flipped the wreath form over at this point in order to wire the pieces on through the back. Keep the form face down on top of the rosemary to help prevent moving. Once the pieces are initially secure on their ends, go back and wire them along their tips.

4. Fill in any spaces with shorter, straight pieces. I was able to work the small pieces into the wreath form with out having to add any more wire, but go ahead if you need to. It's amazing how the wire disappears!

When it's as full as you like-you're finished!


There is a very large rusty nail in our door that we could NOT remove, making the red ribbon hang askew. Oh well. 

I also used bits of wild rosemary, which does not grow in straight stems, to add a little more texture and fluff around it. 

I would also like mine to be fuller so I think next time I will purchase a larger wreath form. OH! The rosemary will dry...so I am going to attempt to keep it fresher longer by spritzing with water daily. Let me know if you have any other suggestions or ideas for that.

Now, whenever anyone enters my home, they are greeted with the intoxicating scent of rosemary. I LOVE it.

Linked to:
LoeLaLoep

Tuesday, October 25, 2011

Big Brother T to lil brother T: make your own toddler T-shirt

The toddler needs clothes. Really. He has outgrown all but one pair of jeans. The temps have taken a dip so he also needs some long sleeved T's. I haven't gotten a chance to go to the thrift store and I really hate to spend money unnecessarily. In an instant I told oldest to see if he had a T-shirt he no longer wore, maybe was too small...I wanted to see if I could make the toddler a quick shirt.

It was ridiculously simple. Sorry for the poor pic quality--I always think to take pix too late. Here is a semi-tutorial for using larger T's to create a piece of toddler clothing.

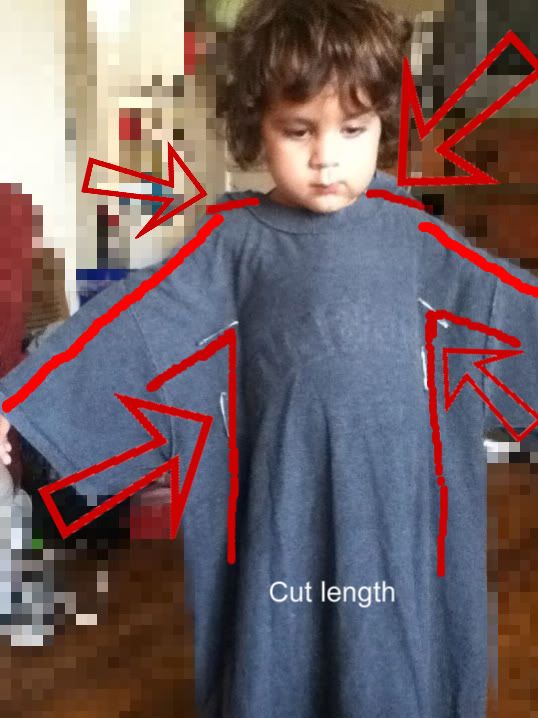
We put the T on him wrong side out so we could pin it to fit. We used LARGE safety pins. This avoids the risk of being poked. (Isn't this little guy such a patient little cutie?)

1. Pull up the shoulders first so you can pin it to avoid the the neck being too wide. Make sure it fits around the head easily to remove.

2. Have the toddler hold out his/her arms just long enough to get a good pin under. This will be where the 'sleeve' will begin.

3. Pin the sides along the waist for an appropriate fit.

4. Don't forget to mark the length you want.

5. I took my serger and eyeballed along the pinned edges. From under the arm to down the sides you are basically cutting or serging an upside down L shape on each side.

BE SURE to NOT serge or cut too close to the child's underarm OR they will not be able to comfortably remove or put on the shirt. Always better to be TOO BIG than too small...because you can always make it smaller but you can't make it bigger. IF you don't have a serger, you can simply sew a straight stitch along your lines/pins.

6. Serge (or cut & sew) the tops of the shoulders. Again pay attention NOT to make the sleeve too narrow. Line up the 'collar' so the edges are even.

7. After the underarm, sides & shoulders are cut and serged/sewn, serge the bottom or hem. I am blessed to have a serger so no hemming was required.

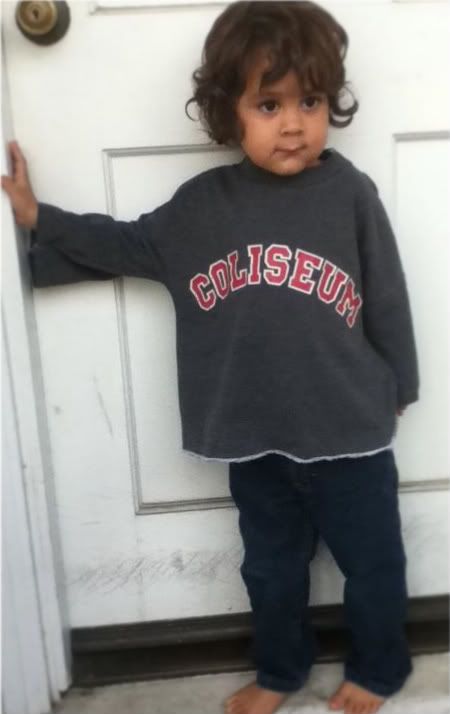
TaDaaaa!

I couldn't be happier with how this turned out. It took all of 10 minutes? 

And the sleeve length was perfect! An adult size, short sleeve T produced a long sleeve toddler shirt. 

The shirt cut ended up being more of a roomy-boxy sweat shirt shape but you could also ways cut/sew it narrower along the abdomen if you wanted. I didn't mind how this turned out and I can't wait to create more.

I love when I can repurpose an item into something new. I know we have a bunch of T's around here and now I can put them to good use instead of tossing and/or buying new ones that this little guy will out grow in no time!

Don't you think this would make a great GIFT for new parents?....sneak one of daddy's old favorite T's & recreate it into a shirt the toddler can wear. You can also make little pants out of old T's as well. (have I posted that before? if not, I really should!)  I have a baby shower coming up soon...hhhmmm... ;-)

For a little girl's T, you could even flare the sleeves, which would be adorable. Don't you think? So many options--it's too easy NOT to try, isn't it? This would make a great first sewing or serging project. The toddler won't mind if you make a mistake and no one will even notice. Go ahead, try it today. I know you can do it. 


Seven Alive

Saturday, March 19, 2011

FREE Owl Pillow tutorial


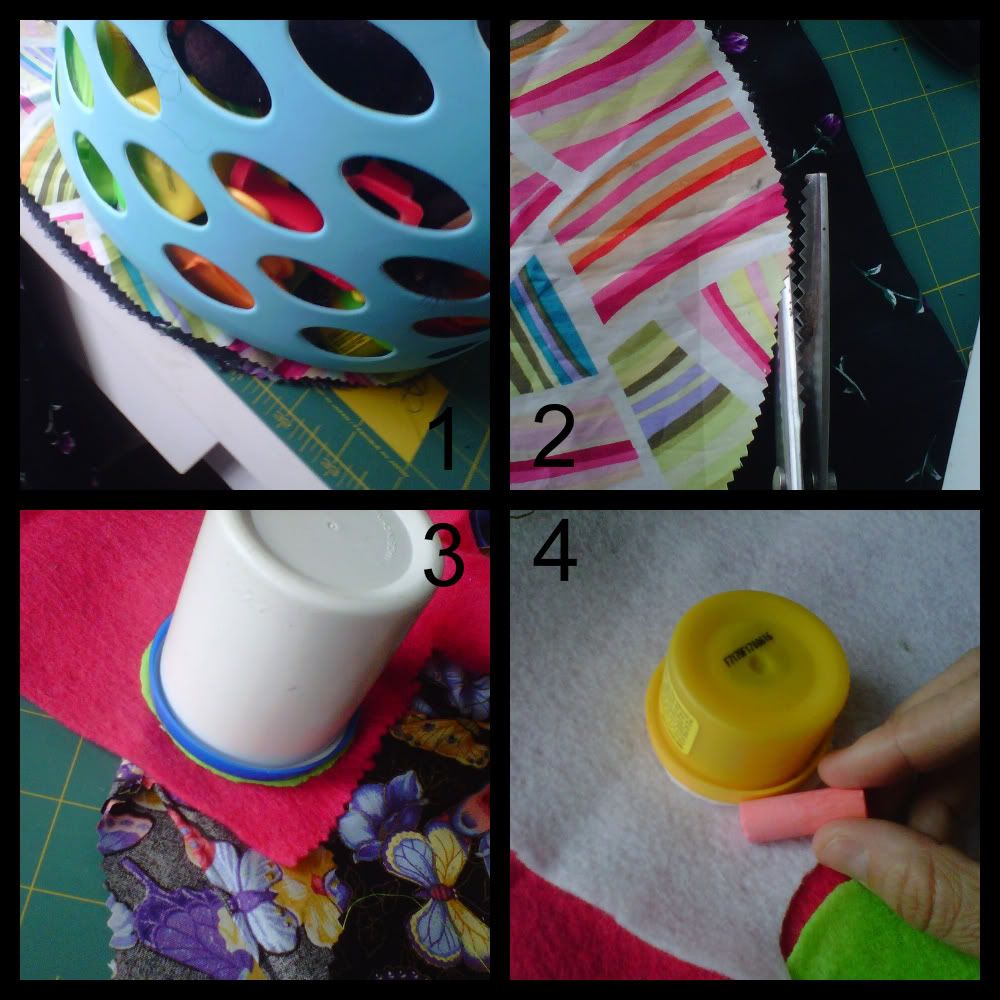
1. Decide how big you want your owl pillow to be. Find a circle shaped object you can trace. You can see I used the bottom of a basket. You can use chalk to trace around your object. Add two peaks, one on each side of the top of your circle to create the owl 'ears'.

2. Cut out your shape. It saves time to cut @ least 2 pieces @ a time. (front & back) You can also layer 4 pieces and have enough for 2 owls in the same amount of time. (I hate cutting so I look for short-cuts all the time!)

3. Again, find a smaller circle shaped household item that you can trace for the outer eye. Cut 2.

4. Find a circle slightly smaller for the white of the eye. Trace & cut 2. Do the same for the black center of the eye, or you can cut those freehand.


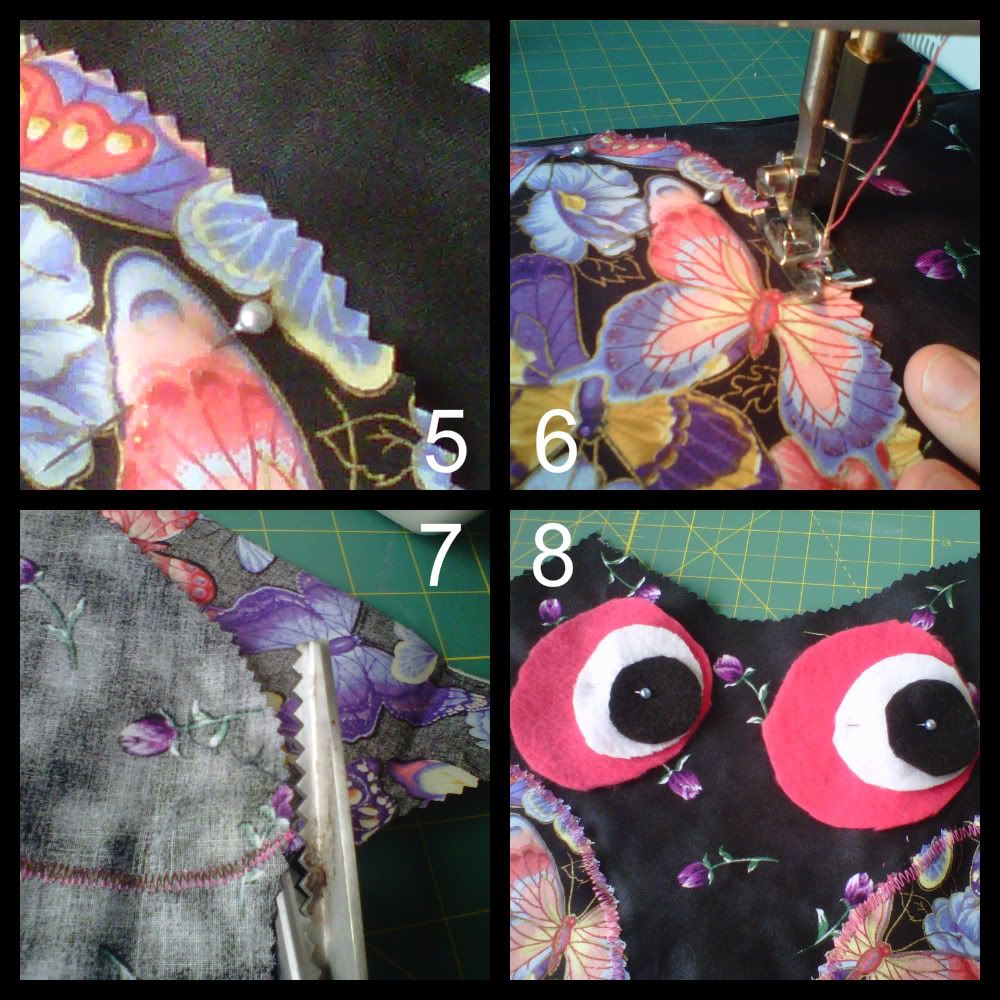
5. Cut 2 half circles or oval shapes out of coordinating fabric for 'wings'. Pin to front of owl right side facing UP.

6. Using the zig-zag stitch setting, sew wings to front of owl.  You only need to sew inside edges.  (the outside edges will be sewn later when you attach front & back)

7. Cut off any excess wing fabric to align to owl body edges.

8. Arrange eye circles as shown & pin.  You can play around with them to create different moods for your owl. (centered, looking up, looking right, looking left etc) When you are satisfied, sew eyes using straight stitch.


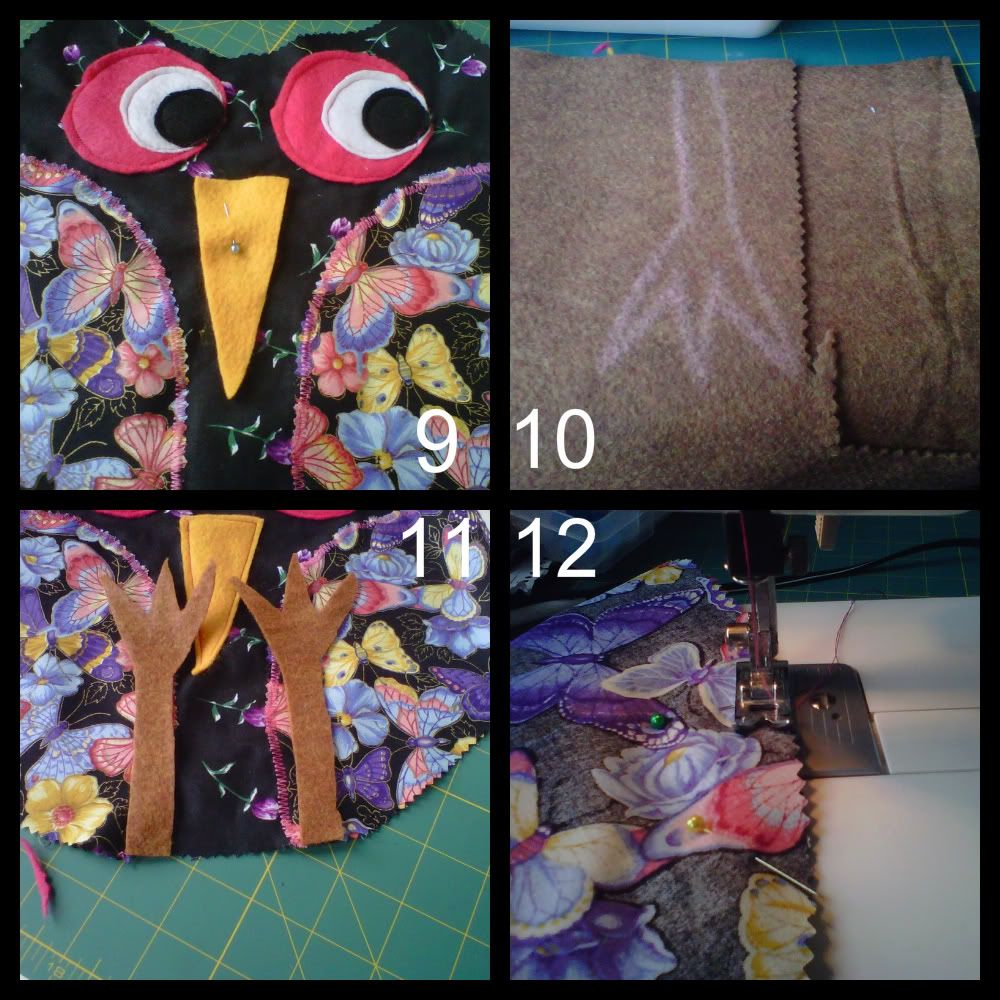
9. Cut and pin beak to front of owl, between eyes. Again, you can personalize your owl beak by making it fatter, shorter, narrower etc.

10. Draw legs (using chalk) to your preferred design. (super long & skinny, fat feet etc)

11. Attach legs, as shown, to bottom edge of owl body, upside down.

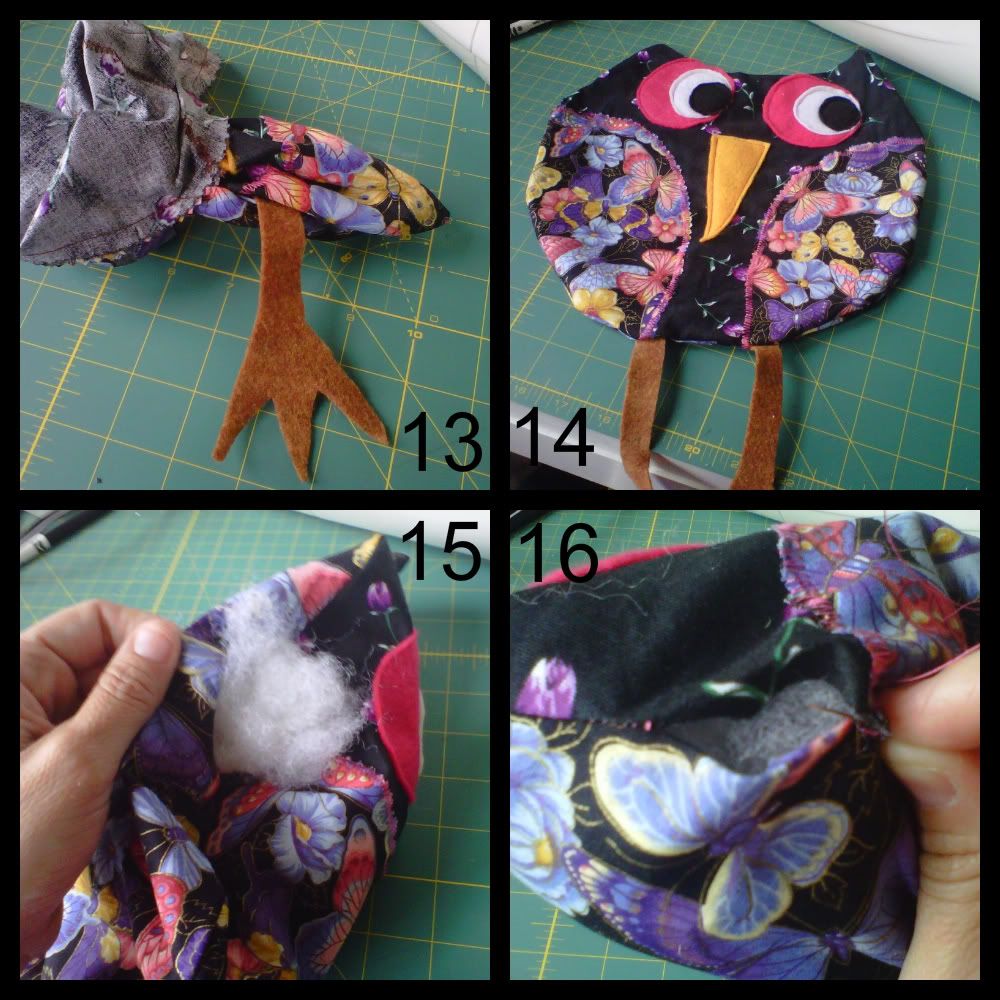
12. Place *back* of owl, right side *down*, on top of owl face.  Pin edges,sew along edges (leave seam allowance) using straight stitch. I like to back stitch over legs to reinforce. REMEMBER to leave a portion OPEN &  unsewn for stuffing.


13. Reach in through opening of body & carefully pull owl right side out.

14. Inspect your owl that all edges are properly sewn, no leg missing or open seams (besides stuffing hole) etc.

15. Begin stuffing your owl. Use plenty of stuffing and be sure to get into 'ear' peaks. A pencil or crochet hook may be useful for those spots.

16. If you are satisfied with the shape & fullness of your owl, hand stitch closed. 


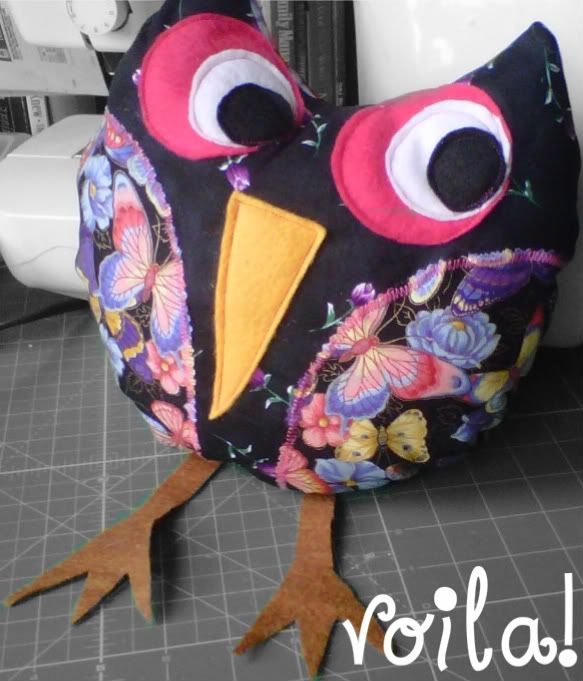
What I have shown you here, I believe is the simplest form to start with, using basic shapes. (mainly circle & triangle) *I* like to use felt for the eyes, beak and feet/legs, but feel free to experiment and have fun with it. I have also made stuffed legs and printed fabric eyes. Use your imagination and have FUN with it!

Let me know if you have any questions.
And OF COURSE, show me what you come up with.  

I'd appreciate a link back if you use this tute & find it helpful.  Feel free to create to your heart's content. ;-)